Welcome to How-To Tuesday – a new regular feature on Epheriell Designs. Each week I will publish a video showing you a skill or technique to help you with your jewellery making.
Video Tutorial
Text and Picture Tutorial
Tools & Materials:
- Sterling Silver wire
- Soldering torch and gas bottle
- Matches
- Soldering tweezers
- Quenching water
- Wire cutters
1. Cut an appropriate piece of wire. 2 inches is a good standard length. Make sure to have your soldering torch, tweezers, and quenching water ready. Oh, and make sure to tie back long hair!

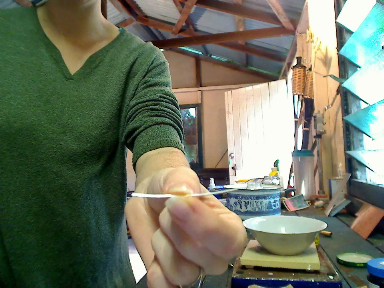
2. Next, use matches to light the torch, and make sure to be careful! Pick up your silver wire with your soldering tweezers (not normal tweezers – soldering tweezers have a wooden handle so you don’t burn your fingers). Make sure to hold it near one end.

3. Turn your flame so it is pointing directly upwards. Then turn your wire vertically, with the longer end downwards. Place it in the flame. Make sure the end of the wire is resting in the hottest part of the flame – where the light blue flame comes to a point.

4. As soon as the wire heats enough, it will start to bubble and form into a ball. Hold it in the flame until the ball is the size you want, then take it out of the flame and put it straight into the quenching water. Be careful not to overheat the metal or it will melt and run!

5. Voila! Place your newly made headpin into pickle to remove the black firescale, and then it’s ready to use.
I use these to make things like this!

***
Want more Epheriell-y goodness? Subscribe to my blog updates! Or follow me on Twitter!
wow, great feature!
oh I SOOOOOO want a torch now!!!!
would have been good to see the finished product close up – maybe pop a pic in at the end of your photo tute?
xx Ange.
Thanks Ange, I was going to, but didn’t get around to it yet 🙂
BRILLIANT! Thanks for the, got my torch coming in a few days so these will be one of the first things on my list to make 🙂
These how to’s rock!! And I love that you have pics and a video since I’m at work and videos aren’t easy to watch on the down low 😉