{above 3 photos by BrisStyle, the rest are by me}

Today I gave my first ever craft workshop! I’ve given so many talks over the last few years, but it’s the first time I’ve taught something like this… well… ever!
My workshop was offered as part of the Saviours of the Lost Arts (SotLA) festival happening in Brisbane at the moment. SotLA is being hosted by BrisStyle this year, and there are free workshops, pop-up markets, talks and more happening all over Brisbane from now until June.
The festival started a few years ago, and the idea is to bring people together to celebrate and practice craft of all types… to keep ancient skills alive in our modern world.
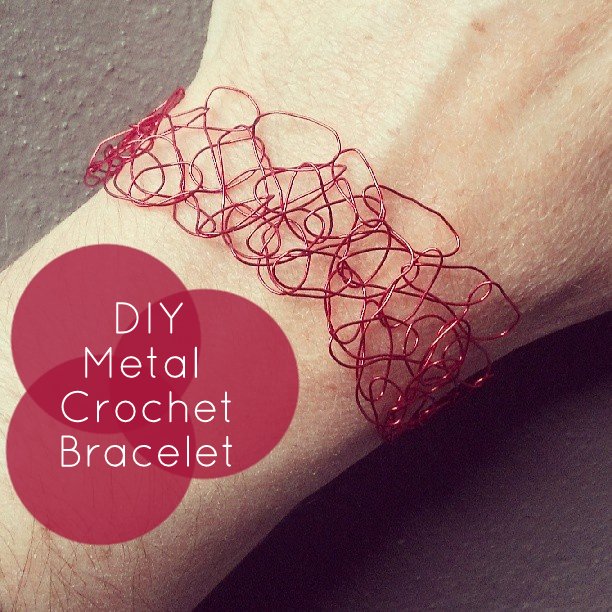
The intersection of old and new was what I had in mind when I put this workshop together – crochet (the old) with metal (the new!).
I first made these bracelets years ago, when I was starting on my jewellery journey – I think I learnt this technique from a YouTube video, but I can’t for the life of me remember who it was by.
The beautiful thing about this technique is its versatility – once you get the hang of it, you can make wider bracelets, necklaces, add in beads… the design possibilities are vast. And if you’re afraid of crochet, don’t worry, you don’t need to do anything more complex than a simple chain stitch.
The participants in today’s workshop had a blast… and we even had a visit from a group of Spanish ladies from the respite centre next door, who promptly went back to their activities room and gave it a go! 🙂
Everyone left with 2 or three bracelets in different colours – some ladies even made necklaces, too.
The ladies who were there loved it so much, I thought I’d share the instructions here, too, in case you want to have a go at this yourself.
You can easily buy all the materials at your local Spotlight (or other craft store).
How to Make a Crochet Metal Bracelet
Materials
- Crochet Hook – between 4 and 8mm
- 26 gague Metal Wire – any colour!
- Wire Cutters
- Pliers
- Lobster Clasp
Instructions
1. Cut three 1 metre pieces of your chosen 26 gauge wire.
2. Tie an open knot at one end (you should be able to fit your pinkie finger through the opening of the knot) leaving a tail of no less than 6cm.
3. Take a crochet hook, thread it through the knot, and proceed to chain 18-20. Make sure you have a tail of at least 6cm when you’re done!
4. Repeat with all three pieces of wire.
5. Take your three pieces of crocheted wire and flatten them. Line them up on the table so all three are flat and facing the same direction.
6. Put the tails at one end together and twirl them so they come together as one piece of wire (like you would twirl hair around your finger).
7. Anchor your twirled end (perhaps get a friend to hold it, or put the end under something heavy) and proceed to plait the three pieces of crocheted wire together loosely.
8. When you reach the other end, repeat the twirling process with the three tails. You may need to trim them – remember to cut them no shorter than 6cm.
9. Take one end and form a loop – again, about the size your pinkie finger could fit into.
10. Wind the end of the loop tightly around its base 2-3 times. Cut off any excess and use a tool to tightly clamp the ends down into the bracelet at the base of the loop.
11. Slide a lobster clasp onto the other end, and repeat the above process OR repeat the above loop-making process and then add a lobster clasp to one loop using a jump ring.
12. Put your bracelet on, then adjust to fit! You can stretch or squeeze the bracelet so that it fits your wrist perfectly.
13. Wear and enjoy!
If you end up making any, I’d love to see them – you can tweet/instagram photos at me, I’m @JessVanDen!


Very interesting workshop