Today I thought I’d share a little tutorial with you all.
A long while back, I ordered myself some business cards. I’ve used most of them up now and, to be honest, they don’t really fit the feel of my store.
I could have bitten the bullet and bought more, but as we’re without jobs and off travelling this year, I’m trying to save money wherever possible! Digging through some boxes, I came across a big packet of glossy photo printer paper, and I hatched a cunning plan…
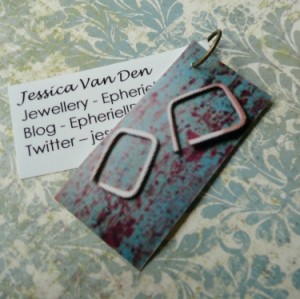
I thought I might be able to print my own biz cards – and use both sides of the paper. I decided to put a pic of my Little Square Hoops on the front, and basic info on the back. Lo and behold, I discovered that you CANNOT print on the back of glossy photo paper!! It just smeared all over. I was disappointed, but I loved the idea.
So, I decided to make a little alteration to my plan…. and make these!
I think they’re really cute, a little bit different, and while they take a little time to make, they’ve got the personal touch that mass-printed biz cards don’t have. So, if you’d like to make your own, read on!
1. The first step is obviously to make the pictures to print from. I used Microsoft Word to do this. Firstly, I chose the photo and made it a good size so that four of them would fit across the screen, and pasted them in over and over. Then, choose what you want to write. I just stuck with the basics – shop, blog and twitter. You might want to use your e-mail instead.
This step can be a little tricky, because you need to make sure that the text, when cut out, is basically the same size as the photo. In Word this is relatively easy, because it gives you measurements across the top and side of the screen, so you can re-size your text to fit.
Just print this out, and you’re half-way there 🙂
2. Now, carefully cut up your pages until you have all of the little pieces. You’ll also need to collect together something to make a hole in the paper, and something to connect them together. This was easy for me – I used one of my jewellery needle files, and some old jump-rings that I had lying around. But you could use a thick needle to pierce the card. To connect them, think about your business. Are you a fabric crafter? Use some ribbon! A knitter or crocheter? Use some yarn! You get the idea 🙂
3. Now, piece through the two pieces together. I press into a cloth so that I don’t deform the paper by holding it while I pierce it – it’s quite tough. Keep hold of it and thread your chosen connecting material through.
4. Ta da! That’s it. Now you have a cute little ‘Flip’ business card to send with your orders!
So have fun… and if you do make some of these for yourself, I would LOVE it if you could send me a picture of what you’ve made!! Or just leave a link to your pic in the comments below!
***
Want more Epheriell-y goodness? Subscribe to Epheriell Designs! Also, you can follow me on Twitter!


Man, you’re so, so clever. Very cool idea. Well done.
This is such a clever idea. Simple but very effective (like most good ideas). Thanks for this, I am going to try it out.
.-= Marjorie ‘Whskr’ Dawson´s last blog ..Art Doll Jewellery Pin by Whskr =-.
Thanks ladies!
.-= Jess´s last blog ..10 Aussie Indie Designers using Embroidery =-.
Wowee Jess! Looking at the first image I thought you had an actual plate with mini earrings attached on them… very 3D… Like it!
Ohh, that would have been tres clever!! Hehe…
.-= Jess´s last blog ..10 Aussie Indie Designers using Embroidery =-.
Here’s a link to my FLIPPING business cards Jess –
http://tashachawner.wordpress.com/2010/04/13/my-new-epheriell-inspired-business-cards/
Thanks so much for inspiring me to make them 🙂
Cheers,
Tasha
.-= Tasha Chawner´s last blog ..My NEW Epheriell-Inspired Business Cards =-.
Wow, they look awesome!! Sooo cool to see your version 😀
.-= Jess´s last blog ..10 Aussie Indie Designers using Embroidery =-.
I love your business cards! I sort of collect them because I consider them little works of art.
I love my own business cards too – the hand stitching on each one totally represents my art. People can’t forget what I do!
Full disclosure: As you’ll read in this blog entry, my mom now stitches my business cards for me because I can’t keep up with everything. Yep, I’ve outsourced to my 77 year old mom. (She loves it.)
http://stefanitadio.blogspot.com/2009/08/old-new-business-cards.html
.-= Stefani´s last blog ..Making Business Websites Personal =-.
Oh, Stefani, those are just gorgeous!
Thanks for your comment 🙂
.-= Jess´s last blog ..10 Aussie Indie Designers using Embroidery =-.
very cool Jess – I have heaps of photo paper to use up , thanks for the great idea.
Love this idea! Thanks for sharing!! Oh, and your cards are fantastic!!!
.-= Donna´s last blog ..Daisies & Birth Announcements =-.